
An Ultimate Guide to LinkedIn Advertising
Over 590 million people use LinkedIn to manage their professional network. According to LinkedIn’s 2016 Census, 40% of people use it on a daily basis for conversations and discussions.
That’s 224,000,000 business people you could be engaging with on any given day. Okay, not every one of them will fall within your target audience, but with clear messaging and smart advertising, LinkedIn is the ideal platform for reaching the people that really matter. This is why it’s such a popular tool for business, from IT consultants to recruitment firms. This guide will explain exactly how you can use it to drive real value for your organisation.
To be clear, this guide is intended for organisations. If you’re looking to develop your own personal brand on LinkedIn, we suggest you speak with LinkedIn trainer, Lea Turner.
The Different Adverts You Can Use on LinkedIn
Sponsored content – just as with Facebook, you can share content you produce and target it to relevant feeds that fit your sales profile. The content will appear on mobile, desktop and tablet, and is great for sharing general company information, updates, videos, whitepapers and articles to the wider reaches of your market. If you want to increase your brand awareness, attract new followers to your company and generally get more views on your content, this is a great option.
LinkedIn Text Adverts – If you want to drive traffic to your page, or to your website, this can be a great fit. Craft a bespoke headline, short description and eye-catching image for desktop newsfeeds. If your audience is more likely to use mobile devices, this may not be the best option for you.
Sponsored InMails– If your goal is to create personalised content which makes your audience engage, InMails is for you. It is compatible on all platforms and messages can have custom greetings, calls-to-action, body texts and links. And the best part is you only pay for messages that send, so you can really stay in control of your budget.
Video Adverts – Pretty self-explanatory, but videos are a direct way to engage your audience and differentiate your brand. These are quite new on LinkedIn, which means there’s loads of opportunity for early adopters.
Single Image and Carousel Ads– If you have a very specific advert for a small audience early in their buying cycle, this is the option for you. You can use a variety of different media, including audio, image, video, and text and there are a range of different options to suit all budgets. Probably the most diverse option you can use on the platform.
Dynamic Ads– If you know your audience has a specific interest, use this option to target adverts that respond to audience activity. It’s great to build relationships a little bit later in the pipeline and you can quickly connect and communicate with the most influential people in your circle. This method includes Follower Ads, Spotlight Ads and Job Ads.
Whichever advertising route you take, be aware that your budget will have to be adjusted frequently in order for your adverts to perform as well as possible. Sometimes you’ll need a £5.00 daily budget, other times it might need a lot more. The important thing is pay close attention and optimise the campaign as frequently as possible.
Polishing your Company Account
So you’ve picked your advert type and defined a budget, but before you can start advertising properly, you want to make sure that your page gives a good account of your brand or service and engages with your business.
With this in mind, we’ve got some basic tips to help you supercharge your account and stand out from the crowd.
- Add a Company Cover Photo and Logo – Pick your most up-to-date imagery and an appropriate shot to display company activity or culture.
- Craft a Company Description – In under 2,000 characters you need to define what your company does, how you do it and most importantly, WHY you do it. Pay extra care to the first 150 characters – they will make up your Google preview.
- Add your business address, company details and URL – In case anyone wants to contact you!
- Create compelling content – Fill your timeline with inspiring, eye-catching and interesting messaging– text, video, audio, and imagery in order to encourage page viewers to follow your company.
Once you’ve created your company page, you should regularly review and optimise it. This is a constant work in progress.
Setting Up Your First Campaign
Now you’ve set up your company page, you’ll be taken to the Campaign Monitor Dashboard. Usually, you’ll get a notification telling you that you need to add billing information – you can ignore this for now.
In the top right corner, you’ll see the key button – ‘Create Campaign’. Click on it, and you can start the basics of setting up your activity.
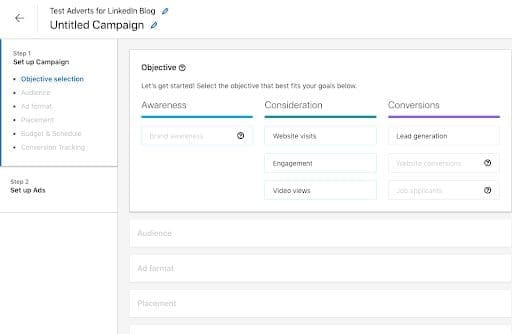
You’ll see a screen like the above. At the moment, LinkedIn are going through a major content update, so some of the older features currently aren’t accessible. Currently, Brand Awareness, Website Conversions and Job Applicants are not available at this time of writing, but you can set up adverts for Website Visits, Engagement, Video Views and Lead Generation. As already explained, pick the option that best fits your goals, but remember, to be realistic. One five-minute website visit is likely to be more valuable strategically in the long term than 100 views on a 5-second video. Once you’ve picked your Objective, it’s time to create your audience.

Audience Attributes
The most important element of setting up a LinkedIn marketing campaign is getting the audience right, and with this menu, you can ensure you cover all basis to get as specific an audience as possible. There are five options on the menu, which we’ll cover below:
Company – exactly as you’d expect, this is anything to do with company specifics, including:
- Company Connections – 1st Degree Connections for employees of your chosen company. This is only available for companies that have over 500 employees or followers.
- Company Follower of – Reach followers of your company page.
- Company Industries – Reach targets related to the industry in question.
- Company Names – The names of the companies your targets have worked for
- Company Size – The size of your target’s company, according to their LinkedIn company profile
Demographics – Quite limited, in order to comply with regulations, but still useful to a point:
- Member Age – Your target’s age, based on set brackets
- Member Gender- Your target’s gender on LinkedIn
Education– Focused on higher education qualifications, this option is great for finding specific professionals with a defined interest or knowledge in a set sector:
- Degrees – Targets who have a defined qualification from a college, university, or another learning institution.
- Fields of Study- Targets who have a specific knowledge or interest in a particular field of study, following college, university or another learning institution.
- Member Schools- Targets who have completed, or studied a specific course at a university, college or other learning institution.
Job Experience – Hit your targets based on what experience they have in the world of work:
- Job Functions – Focus your audience, based on common tasks, activities or work they do on a daily basis.
- Job Seniorities- Reach members based on rank and level
- Job Title- Reach members based on job title, or previous job titles
- Member Skills- Target based on specific information from the ‘Skills and Endorsements’ section of your audience’s LinkedIn profile.
- Years of Experience – Target your audience based on the level of experience and number of years they have worked in a specific role.
Interests – Not quite as broad as the myriad of options on other social media channels, but still very useful for searching for information less related to job roles.
- Member Groups – Search for people who belong to the same LinkedIn Professionals Group.
- Member Interests – Search for interests that align with your business, or target audience.
Alternatively, if you have a set of data from the audience who has visited your website, LinkedIn can process this for you in order to create a bespoke list of contacts and accounts, as well as creating relevant targeting criteria based on the data you’ve already collected. If you think your audience is too narrow, then click the tickbox to ‘Enable Audience Expansion’ – this means LinkedIn will widen your audience to find people with similar job titles, attributes and experience, although be aware they may fall outside your primary target sector and can result in unnecessary expenditure. If you want to make sure your audience also avoids certain characteristics, then you can exclude people, based on all of the criteria listed above.

You should spend about the same time creating your first audience, as you do creating your first pieces of eye-catching, enriching content. It’s important to ensure you get this as accurate as possible, to ensure your testing can be smooth, clear and precise.
Once you’ve defined your first audience, make sure you save it as a template, so you can return to it and update it in the future, once you have a clearer picture of who is engaging with your content on LinkedIn.
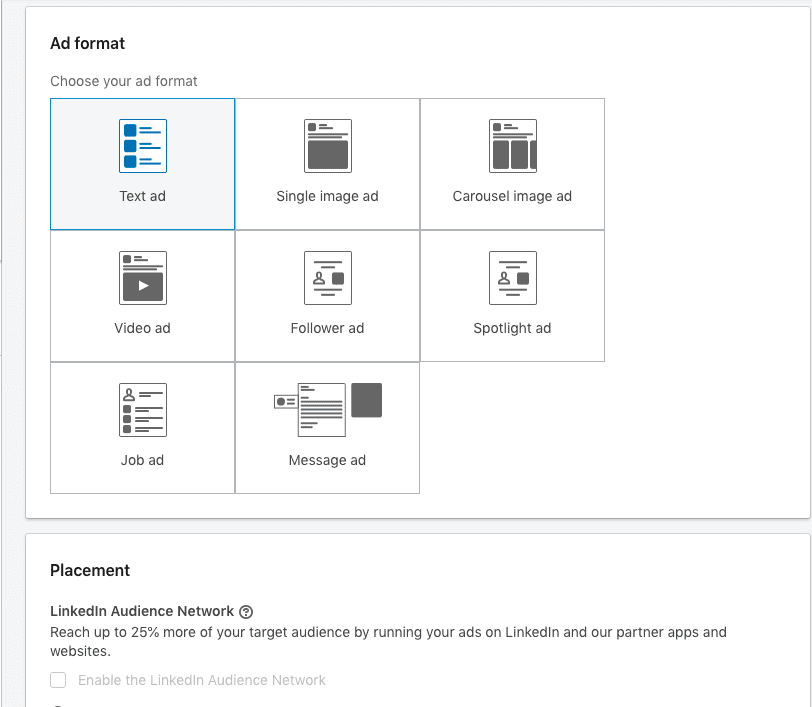
Ad Formats and Placement
We covered this earlier on, but it’s important to pick the right medium to display your content. If you are mainly visual-focused, then a carousel image advert is going to be more suitable than a text-heavy advert. If you are looking to build a personal connection with your targets, then a suitably formatted Message ad is a much better option than a Single Image ad that will clearly stand out as generic. Every ad format on LinkedIn has pros and cons and there isn’t a magic formula for working out which one is best for you – just make sure you pick the right content for the delivery method you choose.
In some cases, you might be able to use the LinkedIn Audience Network to reach a bigger audience. By doing this, your adverts will not only run on LinkedIn, but also on associated partner applications and websites. Although you will probably see an increase in reach, and faster results, be aware that once again, this can drain your daily budget quickly. Also, LinkedIn Audience Network connectivity is only available for some advertising mediums, meaning you can’t just rely on this tool to drive engagement levels up.
Budget, Bid and Schedule
Once you’ve defined an audience, it’s time to put the money where the mouth is and define the financial constraints of your campaign. You can choose between setting a daily budget, total campaign budget, or total and daily budget. My advice would be to set both a daily and total budget, so you can manage your spending and track the changes over time but be aware that LinkedIn can spend up to 20% high than your daily budget total, due to potential changes in the bid amount.
For scheduling your campaign, most times you will want to start immediately and run your campaign continuously from a selected start date, until it spends your budget. But, if you have timed content you want to promote or something with a limited shelf life e.g. a job advert, then you can set a defined start and end date.
The more important issue for advertisers, is defining the Bid Type. There are two options, which are detailed below:
- Maximum Cost Per Click (CPC) Bid: Your advert will be charged based on how many clicks your advert receives. The CPC Bid will usually be the higher of the two costs, as it is quantifiable engagement – someone has chosen to click on and open your advert.
- Maximum Cost Per Mile/Thousand (CPM) Bid: Your advert will be charged based on every 1,000 impressions your advert receives. An impression equals any time your advert is clicked on, scrolled past or hovered over – basically each time anyone views it. Although it is usually cheaper to do this, it by no means guarantees you will see any tangible results.
The Bid Amount box below will automatically update based on this information. You can set the bid yourself, but be aware that LinkedIn will not go over this cost and will not automatically update based on what other advertisers are doing, so you a) may have to spend more time adjusting your budget and b) your campaign may not spend the entire allocated budget, if your bid is too low. If your bid is too high, you might not get a good CPC ratio either, as you will spend your budget too quickly.

Creating An Advert
Once you’ve set this information, it’s time to create your first advert. Depending on the format you’ve selected, there are different ways you can encourage conversions, but this article will be focusing on how to create compelling ‘Direct Inmails’.
- Have a punchy headline – spend time trying to come up with 15-20 different options to use. If your headline doesn’t catch people’s interest within a few seconds, chances are they won’t click on it.
- Introduce yourself personally – give yourself instant credibility by stating your name, role and experience in the market. Be friendly without being forceful or appearing disingenuous.
- Cover your key points succinctly – get your message across as quickly as possible, in the most compelling way. External links to content or embedded videos and images can be a great way to encourage interaction.
- Drive your customer interest – use buttons to steer your customer journey by sending them to key landing pages, or alternatively use Content Capture Forms to collect important customer details.
Once you’ve created your advert, you’ll need to still launch your campaign, otherwise your adverts will remain a draft! Once you set your campaign as live, you’ll have to let LinkedIn check your adverts briefly to review your creative content, but providing you’ve obeyed all their advertising rules, your adverts should be live in no time.
Monitoring Your Adverts
Once your advert has been live for a couple of days, it’s time to evaluate your content to try and find out what works best for your company.
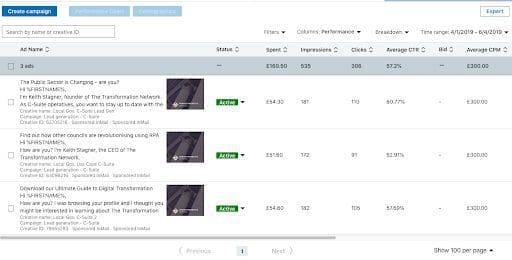
You’ll see a screen like below after your advert has been running for some time. Set your filter to Performance, as this provides the most well-rounded view for all adverts, covering the main metrics applicable to all campaigns:
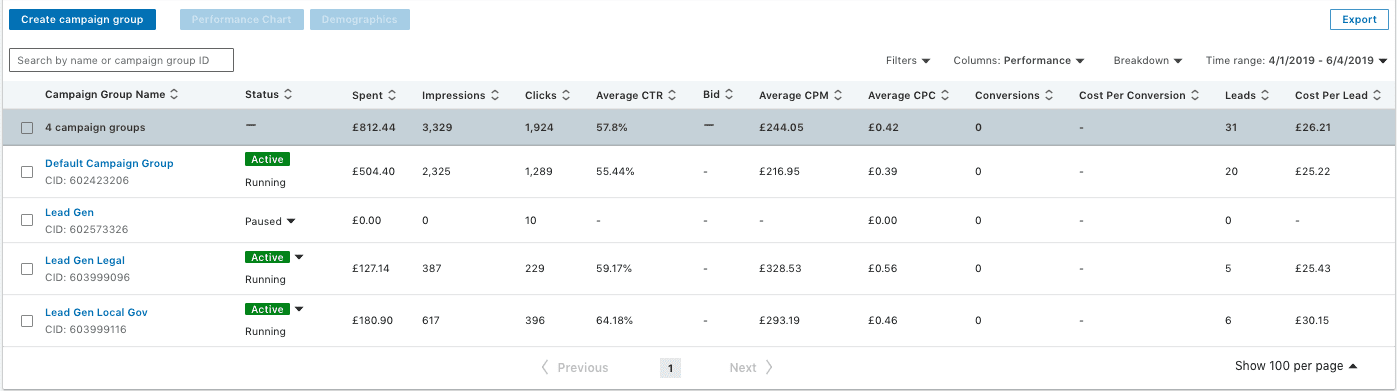
Going through each column in order:
- Campaign Group Name: Self-explanatory. The name of your campaign group, which will include the campaigns you’ve added to this section.
- Status: One of four options: Active, meaning your adverts are sending out to LinkedIn users, Paused, meaning your adverts have been temporarily stopped, Completed meaning your campaign has spent all budget allocated to it and Draft, only seen when adverts have not been put live.
- Spent: How much your campaign has spent. You can adjust the time period for the spending in the top right corner next to the Filter options.
- Impressions: How many people have viewed your advert. Please note, this can include multiple views from the same person.
- Clicks: How many people have clicked to open your advert or view more information about your InMail.
- Average CTR (Click-Through Rate): The percentage of users who click your advert after receiving it.
- Bid: How much your advert is bidding, if you have set manual bidding up.
- Average CPM (Cost Per Mile): How much LinkedIn is charging you for your advert to be viewed 1,000 times. It goes without saying that a higher bid cost means a higher CPM and vice-versa.
- Average CPC (Cost Per Click): How much you are spending for a click on your advert. If possible, you want your CPC to be as close to your bid-rate as possible.
- Conversion: If you are using e-commerce options, how many users have directly converted on your LinkedIn Advert.
- Cost Per Conversion: How much you’ve spent to achieve each e-commerce conversion on LinkedIn.
- Leads: How many leads you’ve generated if you are using LinkedIn InMail Forms to capture data.
- Cost Per Lead: How much you are spending per lead attained via LinkedIn InMail Forms.
There are a couple of additional useful metrics you can access with different filters including Conversion and Leads:
- Lead Form Opens: How many users open your lead form.
- Lead Form Completion Rate: The percentage of users that complete your form after opening it.
Finally Sponsored InMail can give some specific useful metrics for measuring the effectiveness of your specific Mails:
- Click to Open Rate: The percentage of Users that go to your lead form against the total number of users that click on your content
- Cost Per Send: How much it is costing you to send each individual InMail – ideally as close to your Bid Rate as possible.
- Cost per Open: How much you are spending to get a user to open your InMail.
You can check all of these details for your overall campaign, or for the individual adverts. Be sure to monitor regularly and turn off or optimise underperforming adverts by changing their copy to be more appealing or in line with your brand vision, or creating visuals that match your copy more effectively.
Alternatively, you can expand your campaigns further by introducing audience demographics including job titles, locations and interests. Be careful though – wider audiences can lead to reduced bid costs but can also result in your audience being viewed by less relevant customers who are unlikely to convert.
It will take some time to find a working formula for LinkedIn and as a business, you need to accept that your Cost Per Lead (CPL) may start off very high – don’t panic as this is normal and if your adverts are optimised, you can expect them to start performing soon after. Just keep trying different things and once you get an advert with some traction, try and optimise your bid rates and sending strategy as much as possible so you can get the best possible returns for your budget.